Wx Python from scratch
The ListBox, ComboBox and spacers
The ListBox
A ListBox is a widget that presents a list of strings and allows the user to select one or more items.
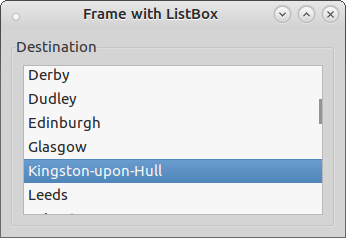
Fig 1. A ListBox
Note that as the contents of the ListBox exceed its height, scroll bar functionality is included. Creating a list box follows the usual pattern (listbox.py):
lst_cities = wx.ListBox(parent=self, size=(300, 150), choices=sorted(self.cities))
lst_cities.Bind(wx.EVT_LISTBOX, self.on_lst_cities_click)
Two arguments have been provided: the size and choices. The choices argument is a list of strings.
The Event object
When an event is triggered an Event object is delivered to the bound method. One very useful method of the event object is GetEventObject. This returns a reference to the specific widget that has initiated the event. This means that not only can we obtain information about the widget, but the same method can be bound to many widgets and we can infer which one has called the bound method.
In this case, I have obtained a reference to the listbox and then used its GetSelection method which returns the index of the selected item.
def on_lst_cities_click(self, event):
    lst_cities = event.GetEventObject()
    print(self.cities[lst_cities.GetSelection()])
The ComboBox
A ComboBox is a combination of a text box and a listbox. It presents at first as a textbox with an arrow on the right hand side. When clicked, the list appears. It will drop down if there is room on the screen (it will extend beyond the frame), otherwise it will pop upwards.
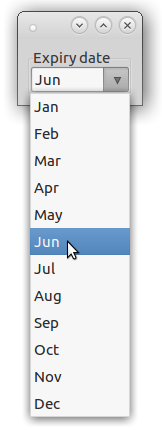
Fig 2. A ComboBox
Again the code takes a familiar form:
cmb_month = wx.ComboBox(parent=self, size=(100, -1), value="Month", choices=self.months)
The value argument consists of a string that will appear in the combobox before a selection is made (combobox.py).
Using spacers
The general principle in wxPython is that a sizer will shrink (or grow) to fit the widgets that it contains. But there are occasions when we need to commandeer space on the frame or we require the sizer to be a bit more flexible. Spacers can help and we have already seen a crude way of forcing the frame to accomodate more space. Here we will use a more subtle method to achieve a common requirement.
In the following frame the Quit button is placed in a horizontal BoxSizer with the Print button.
lbl_name = wx.StaticText(parent=self, label="Name:")
txt_name = wx.TextCtrl(parent=self, size=(150, -1))
cmd_print = wx.Button(parent=self, id=wx.ID_PRINT)
cmd_quit = wx.Button(parent=self, id=wx.ID_EXIT)

name_sizer = wx.BoxSizer(orient=wx.HORIZONTAL)
name_sizer.Add(lbl_name, flag=wx.RIGHT, border=10)
name_sizer.Add(txt_name)

button_sizer = wx.BoxSizer(orient=wx.HORIZONTAL)
button_sizer.Add(cmd_print)
button_sizer.Add(cmd_quit)

main_sizer = wx.BoxSizer(orient=wx.VERTICAL)
main_sizer.Add(name_sizer, flag=wx.ALL, border=10)
main_sizer.Add(button_sizer, flag=wx.LEFT|wx.RIGHT|wx.BOTTOM border=10)
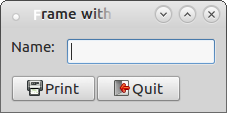
Fig 3. A frame with buttons
In this code I have created four widgets, placed the label and text box in one horizontal BoxSizer and the two buttons in another. Both of these sizers are then place in the main (vertical) sizer.
I do think the Quit button would look better aligned to the right. As I don’t know the width taken up by the name_sizer I cannot place a fixed width spacer in the button_sizer. This is where the proportion and wx.EXPAND flags come in. I will add a spacer (of zero width and zero height) to the button_sizer between the two buttons and set the proportion argument to 1. Then, add the wx.EXPAND flag to the button_sizer and we achieve the effect I wanted: the button_sizer expands to fit the whole width of the main_sizer and the spacer expands, pushing the Quit button to the right (spacers.py).
button_sizer = wx.BoxSizer(orient=wx.HORIZONTAL)
button_sizer.Add(cmd_print)
button_sizer.Add((0, 0), proportion=1)
button_sizer.Add(cmd_quit)

main_sizer = wx.BoxSizer(orient=wx.VERTICAL)
main_sizer.Add(name_sizer, flag=wx.ALL, border=10)
main_sizer.Add(button_sizer, flag=wx.LEFT|wx.RIGHT|wx.BOTTOM|wx.EXPAND, border=10)
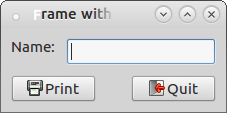
Fig 4. Aligned buttons
Summary
In this lesson we have seen how to implement two more widgets, the list box and combobox. I have also discussed a more subtle use of sizers to improve the placing of widgets on the frame. In the next lesson I demonstrate how to create a menu bar and a status bar.