Wx Python from scratch
Using BoxSizers to create complex layouts
In the last lesson we saw how to create multiple widgets and how to add them to a sizer. In that case it was a vertical BoxSizer and all of the widgets appeared one above the other.
Horizontal alignment
What if we had wanted the widgets side by side? The solution is simple: place them in a horizontal BoxSizer:
sizer = wx.BoxSizer(orient=wx.HORIZONTAL)
This does not look quite right as there is no space above the textbox and button:

Fig 1. A first attempt at horizontal alignmment
The code to place the widgets in the sizer was:
sizer.Add(lbl_name, flag=wx.ALL, border=10)
sizer.Add(txt_name, flag=wx.LEFT|wx.RIGHT|wx.BOTTOM, border=10)
sizer.Add(cmd_quit, flag=wx.LEFT|wx.RIGHT|wx.BOTTOM, border=10)
Remember that we have surrounded the widgets with borders to achieve the separation that we desired. This will need to be adjusted to make sure everything is aligned and spaced correctly:
sizer.Add(lbl_name, flag=wx.ALL, border=10)
sizer.Add(txt_name, flag=wx.TOP|wx.RIGHT|wx.BOTTOM, border=10)
sizer.Add(cmd_quit, flag=wx.TOP|wx.RIGHT|wx.BOTTOM, border=10)
This now gives the desired result:
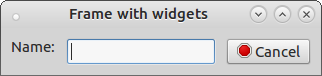
Fig 2. Horizontal alignmment with correct spacing
A sizer within a sizer
What if we required a different layout? Say the label and TextCtrl on one row and the button on another. This can be done because we can nest one sizer within another. So, I will create a horizontal BoxSizer to hold the label and text box, then I will create a vertical BoxSizer to hold the first sizer and the button. I am going to adjust the borders in such a way that the horizontal BoxSizer looks after the external borders for the label and text box, but I will still need to space the widgets within it. The code to achive this is:
horizontal_sizer = wx.BoxSizer(orient=wx.HORIZONTAL)
horizontal_sizer.Add(lbl_name, flag=wx.RIGHT, border=10)
horizontal_sizer.Add(txt_name)
vertical_sizer = wx.BoxSizer(orient=wx.VERTICAL)
vertical_sizer.Add(horizontal_sizer, flag=wx.ALL, border=10)
vertical_sizer.Add(cmd_quit, flag=wx.LEFT|wx.RIGHT|wx.BOTTOM, border=10)
self.SetSizer(vertical_sizer)
Here I have created two sizers: one horizontal and one vertical. The label and TextCtrl have been paced in the horizontal sizer (with a border only to separate the label from the text box). Then this sizer and the button have been placed in the vertical sizer (withh appropriate borders).
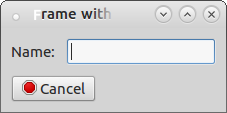
Fig 2. Horizontal sizer within a vertical sizer
Alignment within a sizer
The default alignment in horizontal BoxSizer is flush left, an in vertical BoxSizers flush top. We can alter this behaviour.
Align centrally
The button in the above example is aligned to the left. We centre it using the wx.ALIGN_CENTER flag:
vertical_sizer.Add(cmd_quit, flag=wx.BOTTOM|wx.ALIGN_CENTER, border=10)
Giving:
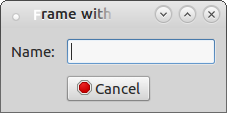
Fig 3. Button centred horizontally
For obvious reasons I have removed the left and right padding from the button. One aspect that might seem confusing at first is that wx.ALIGN_CENTER centres the widget horizontally in a vertical BoxSizer. This is the default behaviour, and in fact it would centre a widget vertically in a horizontal BoxSizer.
Align right
To align the button to the right, use the wx.ALIGN_RIGHT flag:
vertical_sizer.Add(cmd_quit, flag=wx.RIGHT|wx.BOTTOM|wx.ALIGN_RIGHT, border=10)
This gives the desired result:
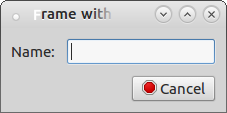
Fig 4. Button right aligned
Note that I have adjusted the right border to give some space between the button and the right-hand edge of the frame.
Spacers
One aspect of the current frame that is unsatisfcatory is the fact that the title is truncated. This happens because the frame is fitted to its contents. Fortunately, wxPython allows us to add spacers to sizers. This gives another element of control. In this case I only wish to add a spacer to the vertical sizer. This spacer should have width, but no height, as I am wishing to increase the overall width claimed by the sizer. I have experimented and found 250 points to be a satisfactory size:
vertical_sizer.Add((250, 0))
Note that the size is contained in parentheses. This is because wxPython expects to see a size tuple here (width, height).
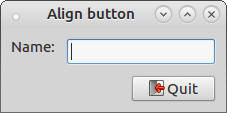
Fig 5. Frame with sizer
Summary
In this lesson we have seen how to use horizontal and vertical BoxSizers. We have placed one sizer within another and considered how we might adjust borders to keep a consistent look. Finally we have used some flags to adjust the alignment of widgets with sizers. The code for the panel is now (spacers.py):
class MainPanel(wx.Panel):
    def __init__(self, parent, *args, **kwargs):
        super(MainPanel, self).__init__(parent, *args, **kwargs)
        lbl_name = wx.StaticText(parent=self, label="Name:")
        txt_name = wx.TextCtrl(parent=self, size=(150, -1))
        cmd_quit = wx.Button(parent=self, id=wx.ID_CANCEL)
        cmd_quit.Bind(wx.EVT_BUTTON,self.on_cmd_quit_click)
        horizontal_sizer = wx.BoxSizer(orient=wx.HORIZONTAL)
        horizontal_sizer.Add(lbl_name, flag=wx.RIGHT|wx.ALIGN_CENTER, border=10)
        horizontal_sizer.Add(txt_name)
        vertical_sizer = wx.BoxSizer(orient=wx.VERTICAL)
        vertical_sizer.Add((250, 0))
        vertical_sizer.Add(horizontal_sizer, flag=wx.ALL, border=10)
        vertical_sizer.Add(cmd_quit, flag=wx.RIGHT|wx.BOTTOM|wx.ALIGN_RIGHT, border=10)
        self.SetSizer(vertical_sizer)
In the next lesson We will investigate the StaticBox which give us the ability to group graphically related controls. Then using a checkbox we will see how the value of a control can be retrieved at run-time.