Wx Python from scratch
Text box, button and events
In the last lesson we saw how to abstract a panel, created a label and used sizers to ensure that everything fitted.
Here, we will cover creating more widgets, look again at sizers and borders, and how to deal with user generated events: in this case the mouse click on a button.
A text box
The code required to create a text box (called a TextCtrl in wxPython) is:
txt_name = wx.TextCtrl(parent=self)
This makes a TextCtrl of default size (enough to enter six “m”s and high enough for one line of text).
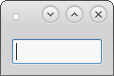
Fig 1. A TextCtrl
We can adjust the size by defining the relevant argument at instantiation:
txt_name = wx.TextCtrl(parent=self, size=(150, -1))
This TextCtrl will now have a width of 150, The -1 value for height retains the default value; this is optimised for a single line of text.
A button
Placing a button on the panel is simlar to the other widgets we have seen so far:
cmd_quit = wx.Button(parent=self, id=wx.ID_CANCEL)
In this case I have used a wxPython StandardID to define the button appearance; it applies the text “Cancel” and, on my chosen theme, it also places an icon on the button (it might appear differently on your system).
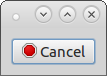
Fig 2. A button
The advantvantage of using wxPython IDs is that you will get a consistent look over your application, provide multi-lingual support, and is generally compatible with other applications. It would have been possible to create the button using the label argument:
cmd_quit = wx.Button(parent=self, label="Cancel")
This would not have created the icon on the button, and would not provide multi-lingual support.
Placing the widgets in the sizer
In the previous lesson we placed the label in the sizer and gave it a border to enhance it appearance. When we add more items to the sizer, we need to think a little more about the borders. As we are using a vertical BoxSizer, the items will be placed one above the other. If we gave each widget a border of say 10 pixels, on all four sides, there would be 20 pixels between each widget. To avoid this, we can add borders to selected sides as shown in the following code:
class MainPanel(wx.Panel):
    def __init__(self, parent, *args, **kwargs):
        super(MainPanel, self).__init__(parent, *args, **kwargs)
        lbl_name = wx.StaticText(parent=self, label="Name:")
        txt_name = wx.TextCtrl(parent=self, size=(150, -1))
        cmd_quit = wx.Button(parent=self, id=wx.ID_CANCEL)
        sizer = wx.BoxSizer(orient=wx.VERTICAL)
        sizer.Add(lbl_name, flag=wx.ALL, border=10)
        sizer.Add(txt_name, flag=wx.LEFT|wx.RIGHT|wx.BOTTOM, border=10)
        sizer.Add(cmd_quit, flag=wx.LEFT|wx.RIGHT|wx.BOTTOM, border=10)
        self.SetSizer(sizer)
Note that I have selected to add a border to just the left, right, and bottom of the TextCtrl and the button. The various flags are separated by the pipe symbol “|”. The widgets have been placed in the vertical BoxSizer and will appear in the order that they have been added, starting at the top. The widgets are evenly spaced and aligned left within the sizer which has expanded to accommodate the widest element. (Remember that the code in the frame ensures that the frame always expands to fit the contents of the panel.)
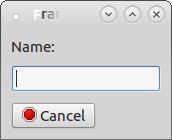
Fig 3. Three widgets in a vertical sizer
The click button event
Many user actions can be detected by wxPython and action taken as appropriate. To introduce this concept, consider what happens when you move the mouse over the button and left-click on the mouse. If you do this at this stage the button will react to show that it has been clicked, but we have not yet programmed any behaviour. To do this we need to bind the event to a method in the program:
cmd_quit.Bind(wx.EVT_BUTTON, self.on_cmd_quit_click)
This line uses the Bind method for the button passing in the type of the event (in this case the left button click on the mouse, identified by “wx.EVT_BUTTON”), and the method to be called (“self.on_cmd_quit_click”)when the event takes place.
In this case I will simply quit Python when the event binding is initiated:
def on_cmd_quit_click(self, event):
    del event
    quit()
Every event is passed as an argument to the relevant bound method. This is a wxPython object that contains information about the event that has initiated the call. In this case it is not required and so it has been deleted. Finally, the Python quit method is invoked.
Summary
In this lessoning we have seen how to create a TextCtrl and a button. They have been placed in a sizer with appropriate borders. Finally we have bound the click event of the button with a method (widgets.py):
class MainPanel(wx.Panel):
    def __init__(self, parent, *args, **kwargs):
        super(MainPanel, self).__init__(parent, *args, **kwargs)
        lbl_name = wx.StaticText(parent=self, label="Name:")
        txt_name = wx.TextCtrl(parent=self, size=(150, -1))
        cmd_quit = wx.Button(parent=self, id=wx.ID_CANCEL)
        cmd_quit.Bind(wx.EVT_BUTTON, self.on_cmd_quit_click)
        sizer = wx.BoxSizer(orient=wx.VERTICAL)
        sizer.Add(lbl_name, flag=wx.ALL, border=10)
        sizer.Add(txt_name, flag=wx.LEFT|wx.RIGHT|wx.BOTTOM, border=10)
        sizer.Add(cmd_quit, flag=wx.LEFT|wx.RIGHT|wx.BOTTOM, border=10)
        self.SetSizer(sizer)

    def on_cmd_quit_click(self, event):
        del event
        quit()
In the next lessoning we will see how BoxSizers can be used to create more complex layouts.