Wx Python from scratch
Adding a panel and a label
We saw in the last lesson how to create and display a frame in wxPython. The most robust way to add widgets to your project is first to create a panel, add the widgets to the panel and then add the panel to the frame. In my experience, this ensures that the results are reproducable on Linux, Windows and Mac.
A panel
A panel is simply a space on which widgets can be placed. (You can have more than one panel on a frame (e.g. a split window).)
To produce a panel, create an instance of wx.Panel using a reference to the frame as its parent window (see line 4 below) (raw_panel.py):
class MainFrame(wx.Frame):
     def __init__(self, *args, **kwargs):
         super(MainFrame, self).__init__(parent, *args, **kwargs)
         panel = wx.Panel(parent=self)
         self.Show()
As there will (usually) be many widgets used in the application, it makes sense to abtract the panel into its own class. This has the advantage that we will confine all of the code for the creation, display, and events relating to its widgets into a separate class and will reduce the complexity of code in the frame, Thus delivering separation of concerns: the user experience from other processing.
To achieve this, I will create a panel class that inherits wx.Panel and calls its dunder-init method (basic_panel.py):
class MainFrame(wx.Frame):
    def __init__(self, *args, **kwargs):
        super(MainFrame, self).__init__(*args, **kwargs)
        panel = MainPanel(parent=self)
        self.Show()


class MainPanel(wx.Panel):
    def __init__(self, parent, *args, **kwargs):
        super(MainPanel, self).__init__(parent, *args, **kwargs)
Note that *args and **kwargs have been included in the dunder-init methods for the panel.
So far this must seem like cookery. The application still looks like it did with the simple code to create the frame. But there are good reasons for it (which will become apparent). I always start my wxPython apps this way.
One more item that needs to be covered before we can add a widget to the panel is the sizer.
Sizers
A sizer is a container for widgets that enables us to organize their position and appearance. For example, we might wish to place the widgets one above the other, or side by side, or on a grid. Sizers allow us to do this and it is good practice to create a sizer even if you only have one widget (this will simplify your life in future if you decide to add more widgets).
The simplest sizer is the BoxSizer. This allows us to place items side by side (the default) or vertically. I will describe the creation and use of the sizer after we have a widget to place in it.
A label
Finally we can add some widgets to the panel. The first will be a label (called StaticText within wxPython). To produce the label we need to create an instance of the wx.StaticText class. We pass to it its parent, in this case the panel, and the text that is to appear on the label:
lbl_hello = wx.StaticText(parent=self, label="Hello")
This produces a label which the system places in the top left corner of the frame.
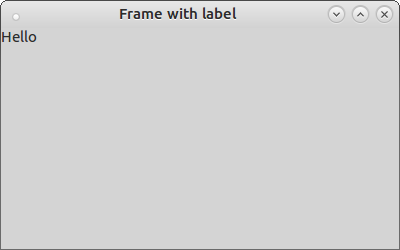
Fig 1. A frame with a label
Let’s now create the sizer and put the label into it. The code for this is:
sizer = wx.BoxSizer(orient=wx.VERTICAL)
sizer.Add(lbl_hello)
self.SetSizer(sizer)
Note that we have:
- created a BoxSizer, in this case the widgets will be placed one above the other;
- added the label to the sizer;
- assigned the sizer to the panel.
The complete code for the panel is now:
class MainPanel(wx.Panel):
    def __init__(self, parent, *args, **kwargs):
        super(MainPanel, self).__init__(parent, *args, **kwargs)
        lbl_hello = wx.StaticText(parent=self, label="Hello")
        sizer = wx.BoxSizer(orient=wx.VERTICAL)
        sizer.Add(lbl_hello)
        self.SetSizer(sizer)
Adding a border to a widget
So far the frame still looks as it did in Figure 1. One of the things that we can do with sizers is to add space around the widgets. In this case, we might want some space between the label and the edge of the frame. This is done when we add the widget to the sizer. For example:
sizer.Add(lbl_hello, flag=wx.ALL, border=10)
The flag argument tells the system to place the border of 10 pixels on the top, bottom, left and right of the widget. The frame has now changed subtly:
Fig 2. A label with border
Placing the panel in a sizer
One final thing that we need to do to ensure consistent results on all platforms is to place the panel in a sizer. This will also allow us to fit the frame to all of the widgets that it holds.
So, in the frame class, I will create a BoxSizer (using the default orientation as it will only contain one item), add the panel to it and assign the sizer to the frame.
sizer = wx.BoxSizer(orient=wx.VERTICAL)
sizer.Add(panel)
self.SetSizerAndFit(sizer)
The one thing to note here is that I have used the SetSizerAndFit method. This will ensure that the frame shrinks or stretches to fit the widgets it holds.
Summary
We have seen how to create a panel and how to abstract it to its own class. I have introduced the concept of the sizer and shown how it can be used to add borders around widgets and to fit the frame to its contents.
The full code is now (label.py):
import wx
class MainFrame(wx.Frame):
    def __init__(self, *args, **kwargs):
        super(MainFrame, self).__init__(*args, **kwargs)
        panel = MainPanel(parent=self)
        sizer = wx.BoxSizer(orient=wx.VERTICAL)
        sizer.Add(panel)
        self.SetSizerAndFit(sizer)
        self.Show()


class MainPanel(wx.Panel):
    def __init__(self, parent, *args, **kwargs):
        super(MainPanel, self).__init__(parent, *args, **kwargs)
        lbl_hello = wx.StaticText(parent=self, label="Hello")
        sizer = wx.BoxSizer(orient=wx.VERTICAL)
        sizer.Add(lbl_hello, flag=wx.ALL, border=10)
        self.SetSizer(sizer)


if __name__ == "__main__":
    screen_app = wx.App()
    main_frame = MainFrame(parent=None, title="Frame with label")
    screen_app.MainLoop()
At this stage the application produces:

Fig 3. Frame fitted to widgets
I will admit this looks slightly ridiculous but note how the border has had an effect.
All of the fundamental work has been done to create a more complex application with more widgets. In the next lesson we will add a text box and a button and explore more layout options and handle user events.