Wx Python from scratch
RadioButtons and the GridBagSizer
In this lesson we will ivestigate two ways to create and organise a set of RadioButtons: firstly using a StaticBox and then using a specialist widget, the RadioBox. Later I will introduce the GridBagSizer. This is the most powerful of all the sizers and allows for greatest control over widget placement.
The RadioButton
It is conventional in GUI applications to use RadioButtons to select an item from a set of mutually exclusive choices; it is also usual to ensure that at least one of the choices is always selected.
To create a single RadioButton:
rb_colour = wx.RadioButton(parent=colour_box, label="red", name="red")
This is almost identical to the CheckBox code in the last lesson. However, wxPython provides a special widget to contain RadioButtons: the RadioBox, and in a RadioBox we do not need to create the buttons explicitely.
Firstly, this is how the buttons would be created in its own sizer using just a StaticBox:
colour_box = wx.StaticBox(parent=self, label="Colours")
sizer = wx.StaticBoxSizer(box=colour_box, orient=wx.VERTICAL)
self.rb_colours = []
colours = ["red", "green", "blue"]
for colour in colours:
    rb_colour = wx.RadioButton(parent=colour_box, label=colour, name=colour)
    rb_colour.Bind(wx.EVT_RADIOBUTTON, self.on_rb_colour_click)
    sizer.Add(rb_colour, flag=wx.LEFT|wx.RIGHT, border=10)
    self.rb_colours.append(rb_colour)
And this is how it can be create using the RadioBox in the MainPanel:
self.colours = ["red", "green", "blue"]
self.colour_box = wx.RadioBox(parent=self, label="Colours",
                              choices=self.colours,
                              style=wx.RA_SPECIFY_ROWS)
self.colour_box.Bind(wx.EVT_RADIOBOX, self.on_rb_colour_click)
This way we do not have to create a list of radioButtons or even the buttons themselves. Note that the flag “wx.RA_SPECIFY_ROWS”, creates a column of buttons. Both sets of code create the same output.
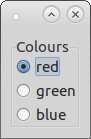
Fig 1. RadioButtons
The wx.EVT_RADIOBOX is triggered whenever one of the buttons is clicked. The RadioBox’s GetSelection() function returns the index on the choices list that has been selected. For example:
def on_rb_colour_click(self, event):
    del event
    print(self.colours[self.colour_box.GetSelection()])
For the full code see radiobox.py.
The GridBagSizer
The GridBagSizer splits the panel into a grid, and widgets can be placed on the grid by giving a position argument (row, column). In the following example, I have placed three labels on the grid (gridbagsizer.py):
lbl_heading = wx.StaticText(parent=self, label="Heading")
lbl_column_one = wx.StaticText(parent=self, label="Column one")
lbl_column_two = wx.StaticText(parent=self, label="Column two")

sizer = wx.GridBagSizer(5, 5)
sizer.Add(lbl_heading, pos=(0, 0), span=(1, 2), flag=wx.TOP|wx.ALIGN_CENTER, border=10)
sizer.Add(lbl_column_one, pos=(1, 0), flag=wx.LEFT|wx.BOTTOM|wx.RIGHT, border=10)
sizer.Add(lbl_column_two, pos=(1, 1), flag=wx.BOTTOM|wx.RIGHT, border=10)
self.SetSizer(sizer)
This creates:
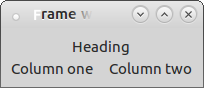
Fig 2. A GridBagSizer
Note that:
- I have added the span argument to the Heading label. In this case it spans one row and two columns;
- the GridBagSizer itself takes two arguments when it is created. These represent the internal borders that will be used in the sizer;
- the external borders have defined when idividual widgets are added.
I strongly recommend that you sketch out your desired layout and plan how you intend to fulfil this with sizers. Use the GridBagSizer sparingly; often the effect can be achieved using vertical and horizontal BoxSizers which can be placed within each other.
Summary
In this lesson we have seen how to create and use radio buttons and the specialised RadioBox. I have introduced the GridBagSizer which allows for flexible widget positioning on a grid.
In the next lesson I will look at two more commonly used widgets: the listbox and the combobox, and I will consider the use of spacers and special flags to control layouts.